DAZ lighting help

FlipTopBin

Member
Game Developer
Dec 5, 2017
176
222
I am trying to light portraits and full length figures without a lot of success. I have watched the youtube videos on 3 point lighting but I never seem to get the same results as others manage in their games. Spotlights seem to harsh and ghost lights seem too fuzzy.

Are there any advanced tutorials on lighting figures I should watch? Are there any tutorials which cover the lighting types other than spotlights available in Daz? Should I be looking at a third part lighting package and if so which one?
 
  • Like
Reactions: TheDevian

hentarashi

New Member
Mar 31, 2018
4
2
Try it using primitives set up with iRay surfaces and emissions.
Or one of the new sets I've been playing with: "BOSS Pro Light Set for Portraits & Promos" I like it so far, good for the premade promo style renders.
 

Roman DeVil

Member
Sep 18, 2017
410
292
...in my opinion it's better using pre-made lighting assets (there are many right here on the Zone), or even better some HDRI ambient or dome, that makes your scene look more "natural". In any case, my advice is to turn off the default camera light when taking a scene.
My two cents...
 

OhWee

Forum Fanatic
Modder
Game Developer
Jun 17, 2017
5,648
28,390
HDRIs are awesome. Lazy, but awesome... note that you can hide the dome/background, but still get the light from the HDRI.

Of course, for indoor environments not so much, unless you are good with using an HDRI of an indoor setting as the background.

As such, HDRIs work really well with the image overlay feature in some games (Renpy, RPGM, etc.), where you are rendering the characters separately from the background.

As for 'regular' lighting.

I've had good luck with rim lighting rigs, but these take a bit more work as they often have multiple lights involved. And they can be a bit more resource intensive due to the number of light sources involved.


Working with rim light rigs takes a bit of practice, but you can get some pretty cool looking results...


I could probably do a bit better with this now (I did this one a few months ago), but note the blueish vs reddish light on her skin... that's the 8 point rim light rig (placed octagonally slightly behind her, at a bit of an angle), with a bit of illumination from the front.

As for more traditional lighting, yeah there are a number of good suggestions already, and I'm sure others will comment as well.
 
  • Like
Reactions: TheDevian

FlipTopBin

Member
Game Developer
Dec 5, 2017
176
222
Interesting rig but probably a little too advanced for me. Ill dl some of the simpler portrait lights and try again.

Thanks for everybodies input.
 
  • Like
Reactions: TheDevian

Philly_Games

Well-Known Member
Game Developer
Sep 9, 2017
1,085
7,657
The best advice I can give is to look into tutorials on actual lighting in real world photography not daz in the beginning. This will teach you where the lights should typically be set. After you have the basics then try it.

But now some Daz tips, remember spots do work and are suggested by the iray engine for performance. Ghost lights should very rarely be used as a main lightsource. Think of those as your ambient light. Below I will detail what I did for this image. I am no expert so please correct me on anything I have said.
woooooow.jpg

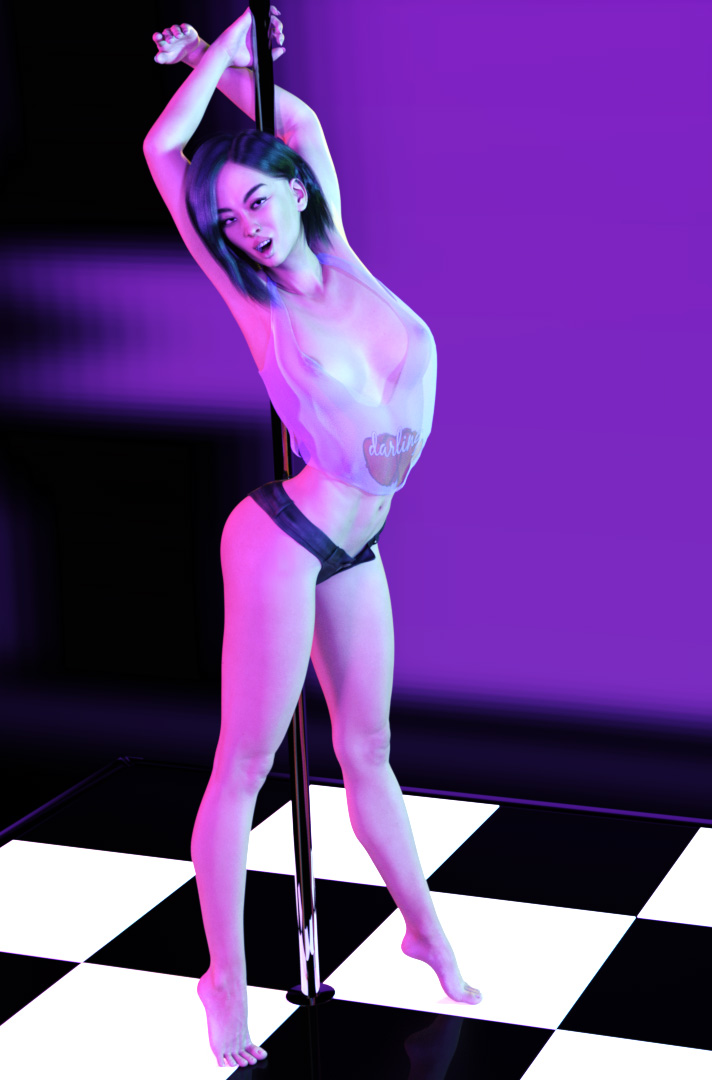
First there are 4 light sources. The HDRI, a key light, a fill light, and a hair light.
In this scene the only walls are the one in front of her and the one behind her. There is no ceiling and there are no walls to her left or behind the camera. This allows the hdri to fill in. Now mind you the hdri used here is a dark sky so it has very little effect on the light but it is present and adds just a touch of detail that you want. I suggest in studio shots to use an hdri but keep its intensity very low such as 0.1 for a bright hdri. Darker hdri's like above wont need to have their intensity reduced as much. Before you set any lights ensure your headlamp is off. ALWAYS TURN THAT THING OFF! Rotate the hdri and view your iray preview till you get the shadows that you want. Looking at the floor and seeing where the shadow goes is a good indicator of this. For this render I made sure the shadows were pushing off to the left so most of the light was coming from the windows direction. Though, as I said before this hdri did not cast any hard shadows.

Next I set my key light. I used a spot light but set its shape from point to circle and gave it a size of 30 by 30. This is very important. A point light doesn't exist in the real world. Its light emitted from a single pixel it just doesn't happen. Setting it to a circle with a size turns it into what is known as a mesh light. The bigger the size the more faded the shadows will be from objects it shines on. A point light would make a perfectly hard shadow with no blur to it. Next I set it's lumens to around 120,000 with a temp around 4000. The temp dictates how far it is on a red to blue spectrum. 1 is dark red then as you approach 3000 it turns orange, then yellow in the 4k to 5k range, then pure white at 6400, then above that it starts to push into a blue light. The key light i positioned close to the ground and pointed somewhat down from her face. Normally you would point the key directly at her but always on an angle but that was not the intended look i was going for. Note: shadows are a good thing :) If the key is directly behind the camera your lighting will be bad because there will be no definition defined on the character. Try it at first about 45 degrees to the right of the subject and a bit above her pointing down at say a 20 degree angle. You can also view her face in the iray preview till you get the shadows you want.

The second light is the fill light. Often in photography this would be the box light, something that has a lot of diffused light to spread out. This light is meant to fill in the figure and reduce the sharpness of shadows. So this light is also a spot and set to a rectangle but with the dimensions of 100 by 100, the lumens are set to 40,000 and its temp I set to 7500 to shift it into the blue. This was entirely a creative choice on the temp. You can play with that however you wish. This light was set probably 5 feet off the floor pointing down at the model at an angle around 30%. The height and angle should not matter to much since its all subjective to what you are creating but the fill is always be competing against the key light. Again in your iray preview adjust till the fill is not casting shadows and just filling in the shadows that the key made. You can use the subjects nose for reference here.

Lastly we have the hair light, typically this is a fairly bright light that is positioned behind and above the model. It's used to outline the hair neck and shoulders which makes the model stand out from the background. It is one of those lights people won't instantly distinguish but it often is the difference maker in shots. Rim lights are similar but typically are at far sharper angles that can be used to highlight parts of the face or shoulders. For now stick with a standard hair light. For my scene my hair light is very low on the brightness scale than it typically would be, only about 30000 lm with a shape of a rectangle and set to 50 by 50. This was only done since it was causing to many shadows on the ground. For a studio shot you can up the brightness a lot and reduce its size since it should normally be a fairly hard light. I initially set my hair light to 90,000 with a size of 20 by 20 which normally would work. This shot just forced me to adjust.

Then I pressed the render button :p

I hope this helps.
 

Rich

Old Fart
Modder
Respected User
Donor
Game Developer
Jun 25, 2017
2,452
6,908
I am trying to light portraits and full length figures without a lot of success. I have watched the youtube videos on 3 point lighting but I never seem to get the same results as others manage in their games. Spotlights seem to harsh and ghost lights seem too fuzzy.
One thing to watch out for with spotlights is that they default, when created, to being "point lights," which cast very unrealistically-sharp shadows. You almost always want to change lights to "have area" (e.g. "rectangle" or "disk") This softens the shadows somewhat - the bigger the area the less sharp the shadow.

Ghost lights tend to be fuzzy because they tend to default to large surfaces. If you shrink the area of the lights, they get somewhat closer to spotlights. They never get all the way there because their emissions are non-directional, however.
 

FlipTopBin

Member
Game Developer
Dec 5, 2017
176
222
Wow! @Philly_Games thank you so much for that great explaination! The real world example has really been an eye opener and incredibly helpful. Just one question I have: for the lumens values you stated, how far away are the lights from the model? I presume that distance is important, if it isn't then forgive me.

I knew about Key and fill and turning off the headlamp before this thread but everything else is new to me and fantasic! I am reading a lot about real world photgraphy as well but I didn't realise quite how much of it applied to Daz as well. I only found out what fstops did today!


So, top tips so far:

Spotlight shapes. The larger the area the softer the shadow
Hair lights
HDRI uses
Temperatures

Angles
Ghost light usage

If anybody has any more tips then keep them coming and if any kind artists would like to talk me through another real world example that would be awesome!
 

Philly_Games

Well-Known Member
Game Developer
Sep 9, 2017
1,085
7,657
The lights themselves are not far off frame. The distance does matter since the light will fall off. The cone you see when u select a light will show where that fall off is I believe. But honestly I have never based any measurement by that, i really just do it by eye via the iray preview. If you play with it a bit you will figure it out.
 

Deleted member 167032

Alternate Existence
Donor
Game Developer
Aug 16, 2017
2,719
4,928
@Philly_Games this I really thank you for as i was not aware what exactly it does or how to use. I have been playing with it but just buggering around. OH i love your lighting in you game, so what you said i am taking to heart...

The temp dictates how far it is on a red to blue spectrum. 1 is dark red then as you approach 3000 it turns orange, then yellow in the 4k to 5k range, then pure white at 6400, then above that it starts to push into a blue light.

If i may give my little 2cents worth, use your Auxilary Viewport and trust me this is a very important tool before rendering. Once you choose the Nvidia Iray option and it has rendered (cached) it will tell you what your render will look like and i've noticed how it will show the graininess and quality apart form shadows etc.. Watch vidz by Jay Versluis on youtube.